


Dengwei International Trade is mainly engaged in various high-end steel import and export businesses, and is a brand enterprise in the metal circulation industry.
Views: 0 Author: Rachel Wynn Publish Time: 2025-05-15 Origin: Site


Soldering copper pipes is a fundamental skill for any plumber or DIY enthusiast. Whether you're tackling a home renovation project, fixing a leaky pipe, or installing new plumbing, mastering the art of soldering will save you time and money. This guide will walk you through everything you need to know to solder copper pipes successfully, from preparation to troubleshooting.
Copper has been a favorite material in plumbing for centuries due to its strength, resistance to corrosion, and ease of use. Soldering is the method used to join copper pipes and fittings by melting a filler metal (solder) into the joint. Unlike mechanical fittings, soldered joints are incredibly strong, leak-proof, and durable. With the right tools and techniques, anyone can learn to solder copper pipes.
Before you start soldering copper pipes, gather all the necessary tools and materials. Having everything in place will ensure a smooth and efficient process.
| Item | Purpose |
|---|---|
| Copper Pipe & Fittings | The primary materials that will be joined together. You will need pipe and matching fittings like elbows, couplings, or tees. |
| Flux | A paste that prevents oxidation during heating and helps the solder flow smoothly around the joint. |
| Lead-Free Solder | The filler metal that will bond the copper pipe and fitting together. Lead-free solder is used for plumbing to ensure it is safe for potable water. |
| Propane Torch | Used to heat the pipe and fitting to the right temperature for soldering. Propane torches are ideal for residential plumbing. |
| Pipe Cutter or Hacksaw | To cut the copper pipe to the required length. A pipe cutter provides cleaner, straighter cuts than a hacksaw. |
| Wire Brush or Sandpaper | For cleaning the surfaces of the pipe and fittings before soldering, ensuring a strong, clean bond. |
| Heat Shield (optional) | Used to protect surrounding surfaces, especially if you’re soldering in tight or confined spaces. |
| Safety Gear | Always wear gloves, goggles, and a face mask when soldering to protect yourself from heat, flux fumes, and potential burns. |

The first step in soldering copper pipe is to prepare the pipe by cutting it to the correct length and ensuring both the pipe and fittings are clean.
Cutting the Pipe: Use a pipe cutter for clean, precise cuts. Ensure the pipe is cut squarely, as angled cuts can cause leaks. For longer cuts, a hacksaw can also be used, though it may require extra effort to ensure the cut is straight.
Deburring the Edges: After cutting the pipe, use a deburring tool to remove any sharp edges or burrs. This prevents damage to the fitting and ensures a smooth, leak-free connection.
Cleaning the Pipe and Fittings: Use a wire brush or sandpaper to clean the ends of the copper pipe and the inside of the fittings. The cleaner the surface, the better the solder will adhere.
Flux is a critical part of the soldering process. It prevents oxidation during heating and helps the solder flow smoothly into the joint, creating a strong seal.
Apply Flux Generously: Use a brush to apply a thin layer of flux to both the inside of the fitting and the outside of the pipe. Don’t skimp on flux — it’s essential for the solder to bond effectively.
Even Coverage: Make sure the flux is evenly spread, covering all areas that will be joined. This will ensure an even and strong connection.
After applying flux, insert the copper pipe into the fitting. The pipe should fit snugly inside the fitting. Ensure that the pipe is fully inserted and aligned properly.
Check Alignment: Rotate the pipe and fitting slightly to ensure the flux is evenly distributed around the joint. Misalignment can lead to weak or leaky joints.
Make Sure the Pipe is Fully Inserted: The pipe should be pushed all the way to the bottom of the fitting, ensuring the correct fit and alignment.
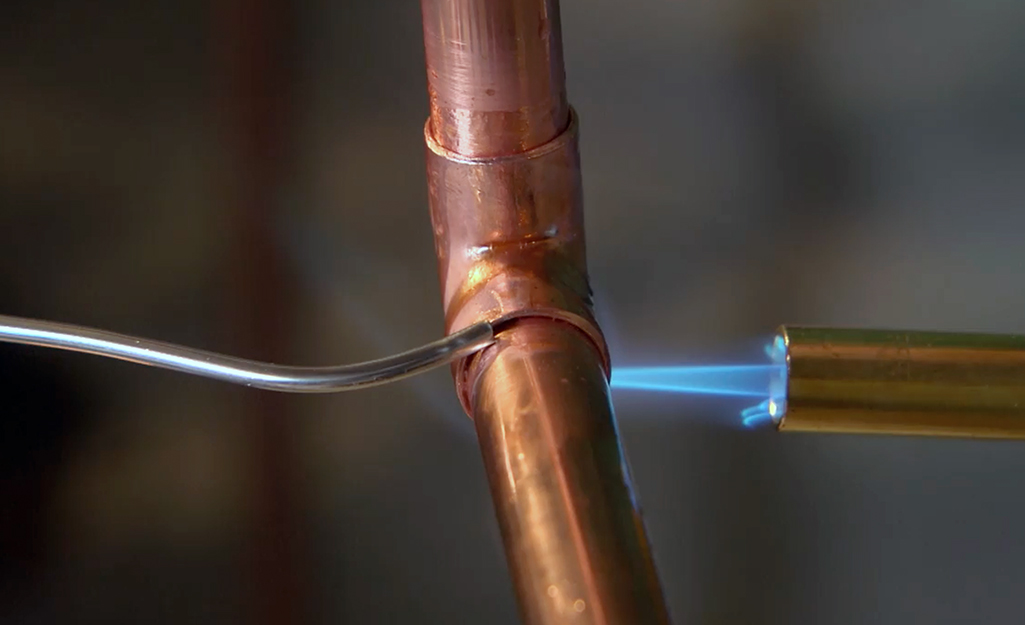
Now it’s time to apply heat. This step is crucial because the solder will only melt when the copper pipe and fitting are hot enough.
Using the Torch: Light your propane torch and adjust the flame so it is blue and steady. Hold the flame about 2–3 inches away from the joint and move it around to heat the pipe and fitting evenly.
Even Heating: Make sure to heat the entire joint. If you focus the heat on one spot for too long, you may cause uneven solder flow or burn the flux.
Watch for Signs of Proper Heat: You will know the joint is hot enough when the pipe starts to turn a dull red color (though it should not glow brightly). If you have a temperature-sensitive flux, it may also change color when it’s ready.
Once the joint is hot enough, it’s time to apply the solder. The solder will melt and flow into the joint by capillary action, creating a strong seal.
Feed the Solder: Touch the solder wire directly to the joint. If the pipe is hot enough, the solder will begin to melt and be drawn into the joint.
Ensure Even Coverage: Move the solder around the joint to ensure that it completely fills the space between the pipe and fitting. A good solder joint will have a shiny, smooth appearance.
Remove the Heat: Once you’ve applied enough solder, remove the heat immediately. Allow the joint to cool naturally before moving on to the next step.
After the solder has cooled, it’s time to clean the joint. This will remove any excess flux and ensure the joint is ready for testing.
Wipe Away Flux: Use a damp rag to wipe away any residual flux, which can cause corrosion if left on the pipe. Be sure to do this while the pipe is still warm.
Inspect the Joint: Check the joint for any gaps or weak spots in the solder. The joint should have a smooth, shiny appearance and a complete seal around the pipe.
After the joint has cooled and been cleaned, it’s time to test it. Turn on the water supply slowly and check for any leaks around the joint.
Slowly Turn On Water: Gradually turn on the water supply to allow any air in the pipe to escape. Check the joint for leaks by running your fingers around the area.
Repair Leaks: If you notice any leaks, you will need to heat the joint again, remove the solder, clean it, reapply flux, and re-solder the joint.
Don’t Overheat: Overheating can damage the copper pipe or burn the flux, leading to weak or faulty joints. Only heat the pipe to the point where the solder will melt and flow.
Use Proper Soldering Technique: Apply solder in small amounts and allow it to flow evenly around the joint. This ensures a clean, strong seal.
Be Patient: Rushing the process can result in leaks. Take your time to ensure each joint is heated properly and sealed with the correct amount of solder.


